
I use ISO/IEC 27559:2022 to reduce identification risk - not promise zero risk. Before sharing clinical images, I check the data, clean DICOM metadata and pixels, assess what recipients could link to other records, and validate the final export.
My release checklist covers 5 steps:
- Set the scope: Identify files, research needs, recipients, restrictions, reviewers, and the HIPAA pathway.
- Clean metadata: Apply DICOM rules to identifiers, dates, free text, private tags, and links between records.
- Review images: Check text, annotations, faces, and derived images; verify that redaction preserves the data needed for research.
- Assess remaining risk: Review outside-record linkage, reports, and AI-related risks in the recipient’s setting.
- Approve and track the release: Document validation, remaining risks, approvals, access rules, and reasons for another review.
For U.S. releases, I treat HIPAA Safe Harbor and Expert Determination as separate legal paths - ISO alignment alone is not enough. My rule is simple: <u>verify the exported data before release</u>. Processing settings alone do not prove that the files are ready to share.
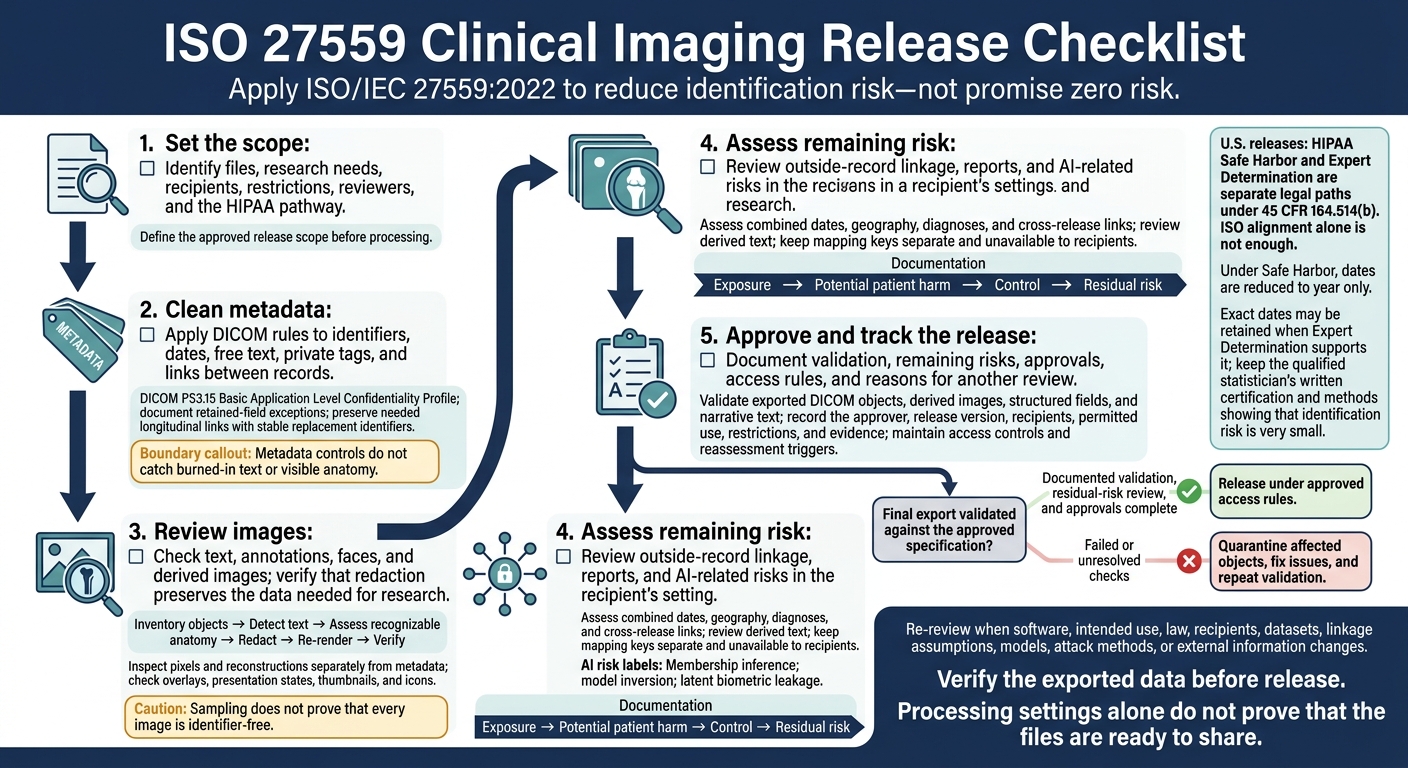
ISO 27559 Clinical Imaging Release Checklist
dicomqc: Why audit de-identified DICOM data?
sbb-itb-535baee
Apply DICOM Metadata Controls
Map the approved scope to a DICOM PS3.15 Basic Application Level Confidentiality Profile. Apply the selected rules to metadata only, before inspecting pixels.
Process Identifiers in Attributes and Sequences
Apply the selected rules to every attribute and sequence, including free-text fields and private tags. Automated text detection can support rule-based review.[1] For each retained field, document the rule that allowed it and the reason for keeping it.[1]
Free-text attributes and private tags may still contain PHI. Keep exceptions only when their research value and the reason for retaining them are documented.
Manage Dates, UIDs, and Longitudinal Links
If the workflow uses replacement identifiers, keep them consistent across the approved scope. Under HIPAA Safe Harbor, dates are reduced to year only, which can remove timing signals. Expert Determination may allow precise dates when a statistician certifies that the risk of identification is very small.[1]
When a study needs timing and longitudinal links, use stable replacement identifiers rather than deleting values.[1]
Compare Metadata Treatments and Research Effects
| Data element | Privacy risk | Treatment | Validation |
|---|---|---|---|
| Names | Direct identification | Remove or replace under the selected profile | Verify that no original names remain |
| Dates | Linkage to known clinical events and timing signals | Remove or reduce precision; retain exact dates only when Expert Determination supports it | Check date-rule results and intervals |
| Free text and private tags | Hidden PHI in unstructured content | Use automated text detection and remove unless explicitly approved | Run a text scan and review exceptions |
| Temporal or relational links | Linkage across releases | Use stable replacement identifiers when the study needs to preserve these links | Check consistency across releases |
Metadata controls do not catch burned-in text or visible anatomy. The next step is pixel review.
Inspect Pixels and Recognizable Anatomy
After metadata cleanup, inspect pixels and reconstructions separately from DICOM metadata. They can still expose identifiers and faces.[2][5]
Find and Remove Burned-In Identifiers
Check entire frames, including borders, for names, medical record numbers, accession numbers, dates, and facility labels. Review multiframe images, secondary captures, screenshots, scanned documents, and dose pages. For ultrasound and endoscopy cine loops, look for frame-specific annotations. When content varies greatly, review every frame or use validated frame-level detection. Check overlays and presentation-state annotations separately.[4]
Use the DICOM Clean Pixel Data Option when identifying text or graphics are embedded in Pixel Data. Mask the region containing the identifier, re-render the object, and verify that the released pixels no longer expose it. Set Burned In Annotation (0028,0301) to NO only after confirming that the output contains no burned-in identifying annotation. Recreate or clean derived thumbnails and icons that could retain the original text.[3]
Review Recognizable Anatomy and Redaction
Removing text doesn't remove every recognition risk. Follow the same sequence each time: inventory objects, detect text, assess recognizable anatomy, redact, re-render, and verify.
For CT and MRI, inspect scout images, localizers, multiplanar reconstructions, facial structures, and 3-D renderings. For radiography and mammography, preserve laterality and diagnostic markers. For pathology and scanned documents, check labels, handwriting, barcodes, accession stickers, and embedded reports.
Consider the Clean Recognizable Visual Features Option when an image or reconstruction could allow someone to be recognized. Decide whether defacing, cropping, masking, surface removal, or exclusion fits the research objective. When automated detection is unreliable, send uncertain findings for manual review by both a privacy reviewer and a modality-qualified clinical expert, particularly when assessing medical devices. Retain the anatomy only under an approved, access-controlled arrangement with documented residual risk.[4][5][6]
Document Pixel Reviews and Failed Checks
Record the objects and frames inspected, source and released versions, cleaning method, software and settings, overlays and presentation states reviewed, recognizable-feature assessment, reviewers and their qualifications, review dates, redactions, exceptions, and validation results.
State whether review coverage was complete, risk-based, or sampled. For sampling, document the sample size, selection method, limitations, and rationale. Sampling does not prove that every image is identifier-free.
Quarantine objects with residual identifiers, incorrect output attributes - such as an incorrect Burned In Annotation value - unresolved visual-identification concerns, or unrecoverable redaction damage. Document unresolved findings, address them, and repeat validation before release.[6] Pass objects forward only when pixel review, redaction, and validation all match the approved scope.
Assess Remaining Linkage and Sharing Risks
Assess the release in the recipient’s sharing environment, not just as cleaned files. After removing metadata and cleaning pixels, test whether the remaining data can still link to outside records available in that environment.
Check Combined Identifiers and Derived Data
Focus on what can still be linked after de-identification, rather than fields already removed. Check combinations of dates, geography, diagnoses, and record-linkable fields across releases against source systems, registries, and recipient records.
Review reports, unstructured notes, and other derived files for identifying details, too. If model training requires longitudinal structure, use surrogate IDs. Keep the mapping key separate and unavailable to recipients.
Document Mitigations and Residual Risk
Document each remaining risk in terms of the specific release, rather than as a generic privacy note. Record the exposure, potential patient harm, control, and residual risk.
| Risk source | Likelihood or exposure condition | Potential harm | Mitigation | Residual risk | Review trigger |
|---|---|---|---|---|---|
| Dates, geography, and rare diagnosis combined | Recipient has matching clinical or registry records | Disclosure of diagnosis or study participation | Reduce date and location precision; limit disclosed fields | Unusual combinations may remain linkable | New external records become available |
| Record-linkable fields across releases | Recipient can combine records across releases | Exposure of a broader patient history | Use surrogate IDs; keep mapping keys separate and unavailable to recipients | Longitudinal patterns may reveal identity | New dataset, recipient, or linkage assumptions |
| Reports or other derived text | Free text can retain identifiers that field-level scrubbing misses | Direct identification or sensitive disclosure | Review reports and notes with NLP-based de-identification tools | Automated detection may miss identifiers | Processing software changes |
| Model outputs and recipient-side image linkage | Matching images or model attacks can recover identity-linked signals | Identity matching or membership disclosure | Limit image access. For AI training, assess membership inference, model inversion, and latent biometric leakage, especially for rare or underrepresented cases; consider differential privacy.[1] | Biometric signals and attack uncertainty may remain | New model, attack method, or external information |
Assign Release Authority and Reassessment Triggers
In the release decision record, document the approver, release version, permitted use, recipients, restrictions, evidence, unresolved residual risks, and basis for approval.
Validate and Document the Release
After technical cleaning and risk review, validate the final export and document the release decision.
Validate Output Against the Approved Specification
Check the exported dataset - not just the processing settings - against the approved de-identification specification. Cover DICOM objects, derived images, structured fields, and narrative text, and document any added privacy layers.
If validation fails, fix the issues and retest. Keep evidence of both the fixes and the retest.
Complete the Release Record
Use a release checklist to record whether you selected Safe Harbor or Expert Determination under 45 CFR 164.514(b).
For Expert Determination, keep the qualified statistician’s written certification and methods showing that the risk of re-identification is very small. A claim that identifiers were removed isn't enough. Document the specific risk for high-risk patients, including those with rare diseases or from underrepresented groups. Link the release record for the specific recipient and use to the validation file and residual-risk decision.
Include applicable IRB approvals or waivers, legal review, compliance with state consumer health data laws, and contractual data-use restrictions. Limit access to identifying logs and mapping files. Keep an inventory of AI software that handled ePHI and the Security Rule controls applied.
Once the release record is complete, use it to control access and trigger future re-review.
Maintain Access Controls and Governance Records
Record authorized access in the approved sharing environment, permitted use, recipient agreements, and review dates. Re-review when software, intended use, or law changes.
Conclusion: Require Review Before Release
Release only after documented review confirms the method, validation, residual risk, and approvals.
FAQs
How can I preserve research value while de-identifying DICOM images?
Handle each case separately. Under Expert Determination, keep critical research data only when a qualified expert certifies that the risk of re-identification is very small.
Use DICOM confidentiality profiles to remove or generalize selected metadata while keeping useful acquisition parameters and study dates. Crop or blur identifiers in burned-in text. For longitudinal links, use consistent aliases that can’t be derived from the original identifiers. Check that the data still supports research by assessing model performance or the distributions of critical variables.
When should I choose Expert Determination over Safe Harbor?
Choose Safe Harbor for a straightforward, rules-based approach when you can remove all 18 HIPAA identifiers without reducing the data’s usefulness. It’s a good fit for routine, low-risk sharing.
Choose Expert Determination when analytics or AI model training requires keeping details such as partial dates or geographic data. A qualified expert must conduct and document a statistical analysis to confirm that the risk of re-identification is very small.
What evidence shows my imaging dataset is ready to share?
Document how you removed or generalized PHI-bearing DICOM header tags and obscured burned-in annotations, including text overlays and visible labels. Include evidence from both automated scans and manual spot checks of sampled files to show that you checked for remaining identifiers.
Record your de-identification method, the specific rules you applied, and a statistical assessment confirming minimal re-identification risk.
