
IEC 62304 compliance testing comes down to three things: classify the software correctly, tie each risk control to a test, and keep records that match the released build. If that chain is broken, reviews get harder fast.
Here’s the short version:
- I start by defining scope, software safety class (Class A, B, or C), and security requirements
- I make sure hazards and threat findings turn into clear, testable requirements
- I run tests at unit, integration, system, and regression levels
- I link each test back to risk controls, requirements, and build records
- I document failures, retests, CAPA links, and release decisions
A simple fact sits underneath all of this: the higher the safety class, the more test evidence and traceability you need. For software tied to patient harm, security checks like login control, update validation, and safe-state behavior are not side work. They are part of core verification.
In plain terms, this workflow is about proving five things:
- What software is in scope
- What could go wrong
- What control is supposed to stop it
- What test checked that control
- What result was recorded on the released version
If I had to boil the article down to one line, it would be this: IEC 62304 testing is not just about software that passes; it is about records that prove why you can ship it.
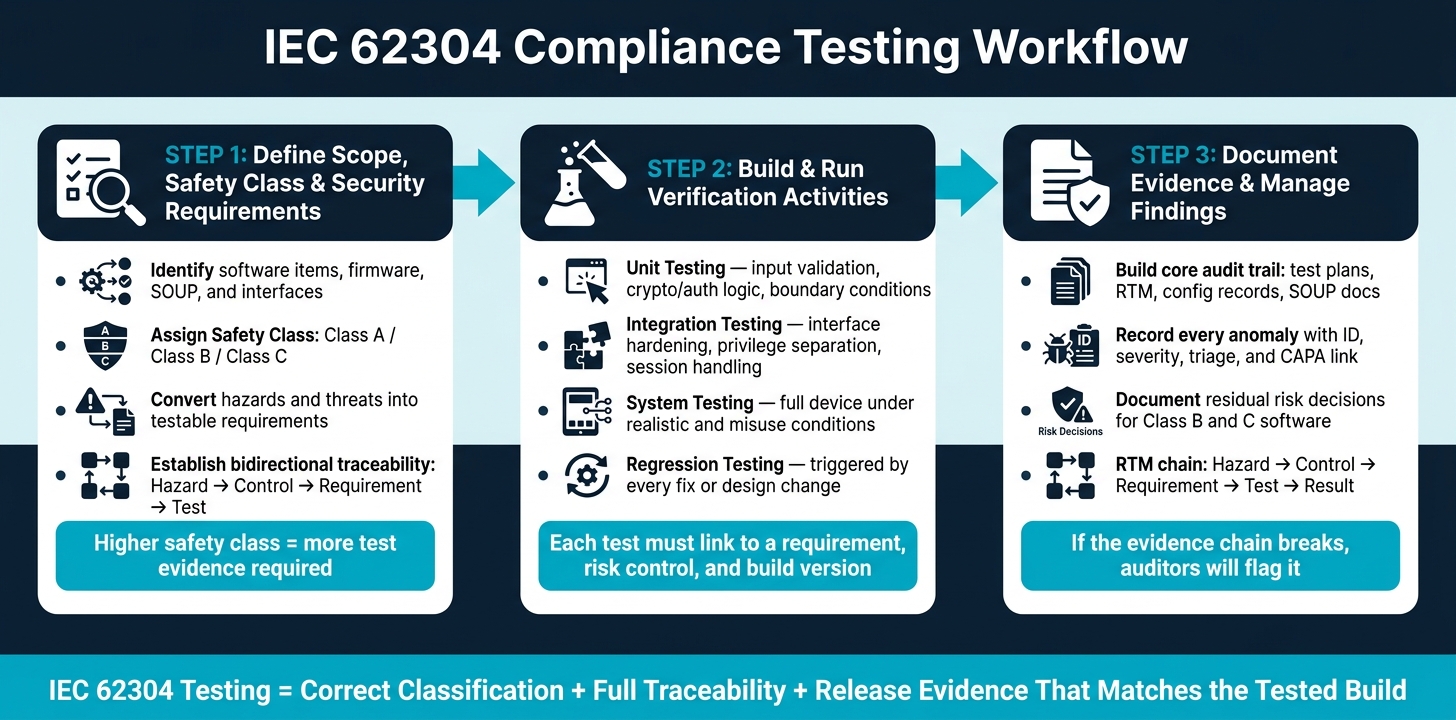
IEC 62304 Compliance Testing Workflow: 3-Step Process
Understanding the IEC 62304 Safety Classes and the Mysterious V-Model
Step 1: Define Test Scope, Safety Class, and Security Requirements
Before you write a single test, lock down the scope, safety class, and security requirements. In plain English, that means listing every software item and firmware module that can affect a safety-related function, using the assigned safety class to decide how much testing and evidence you need, and turning your risk analysis into requirements a test can check. This scope sets the boundaries for all verification work that comes next.
Identify Software Items, Interfaces, and SOUP Components
Start with a full list of every component that could affect a safety-related function. That includes embedded firmware, middleware, operating system services, mobile or cloud-connected software, network APIs, update mechanisms, and authentication services. For each item, document whether it can affect safety and write down why it belongs in scope, or why it does not. Keep that rationale in the audit trail.[2]
SOUP needs close review. Third-party libraries and other software of unknown provenance are SOUP.[5] Defects or security weaknesses in that code can change how much testing you need, how you run regression cycles, and what evidence you need before release. A formal SOUP inventory, often kept as a software bill of materials (SBOM), helps support IEC 62304 compliance and cybersecurity risk management and lines up with FDA expectations.[3][4]
Then review every external interface. USB ports, Bluetooth, Wi-Fi, Ethernet, serial ports, service ports used for maintenance, mobile app APIs, and cloud services can all become attack paths or failure points. These interfaces show where security verification needs the most attention. For each one, record:
- Whether it is local or remote
- Whether it is authenticated or unauthenticated
- Whether it carries safety-relevant data or commands
Any interface in that last group needs negative testing and input-validation tests.
Convert Hazards and Threats into Testable Requirements
Once the inventory is done, bring in your hazard analysis and threat model. Translate each risk into a requirement that a test can verify.[3][4] For example, a requirement might say that firmware updates that fail signature verification must be rejected. A vague statement like "the system shall be secure" doesn't give you anything you can test.
Security requirements for medical device software usually cover authentication, authorization, secure boot, code signing, integrity checking, secure update handling, communication protection, logging, and fail-safe behavior.[3] For connected devices, add certificate management, session timeout, and resistance to malformed inputs. For embedded firmware, include memory protection, rollback prevention, and watchdog recovery behavior.
Bidirectional traceability is a must. Every hazard should link forward to a risk control, then to a requirement, then to a test case and its evidence artifact.[1][4] And in the other direction, every test should trace back to the hazard it supports. That two-way chain makes design changes much easier to assess. It also gives auditors a clear line from risk to proof that the control was checked.
The hazard log defines risk; the test proves the control.
Requirements-to-Evidence Mapping Table
The table below shows how each requirement type connects to the evidence artifacts behind it. This keeps the compliance record aligned across design, testing, and risk management documents.
| Requirement Type | Example Requirement | Evidence Artifacts Needed |
|---|---|---|
| Authentication | Only authenticated users may change device configuration | Design records (role-based access model), unit tests (authentication logic), integration tests confirming interface protection, system tests demonstrating blocked unauthorized access attempts, risk management records (residual risk assessment) |
| Firmware integrity | Firmware updates must be signed and verified before installation | Cryptographic design documentation, negative tests with tampered packages, update rejection logs |
| Secure communication | Data transmitted over network interfaces must be protected in transit | Interface specification, integration tests confirming protocol enforcement, security test results |
| Fail-safe behavior | Device must enter a safe state after a watchdog timeout | Architecture documentation, unit tests for watchdog logic, system-level fault injection test results |
| SOUP dependency | Third-party authentication library must perform as specified under failure conditions | SOUP evaluation record, integration tests under simulated failure, anomaly log entries if defects are found |
Use this map to plan verification coverage in Step 2.
Step 2: Build and Run IEC 62304-Aligned Verification Activities
Once the scope is set, the next job is to run the planned verification work and collect evidence linked to each requirement and risk control. The test plan should follow the scope and requirement map from Step 1. Start with unit tests, move to integration tests, then system tests, and finish with regression testing after any defect fix or design change.
Each test stage should produce executable evidence tied to a requirement and to the exact software version tested. That evidence trail is what carries the work from small unit checks all the way to full-system verification.
Run Unit and Integration Tests for Security-Critical Behavior
Unit tests should focus on the smallest security-relevant software units that handle security-sensitive logic. That includes input validation, boundary handling, error returns, cryptographic routines, secure boot checks, privilege checks, and responses to malformed data.
Test both expected and negative cases. In practice, security flaws often show up when inputs are malformed, missing, or outright malicious. For firmware, that can mean checking that a bootloader rejects unsigned images and that a parser rejects overlong fields without memory corruption.
Once the security logic works at the unit level, move to integration testing to see how those controls hold up across interfaces and hardware boundaries.
Integration tests check how tested units interact at subsystem boundaries across interfaces, protocols, and hardware layers. The point is simple: a control that works in isolation also has to work when other parts of the system get involved.
Focus on areas such as:
- Secure communication
- Interface hardening
- Privilege separation
- Session handling
- Message integrity
If one component creates a signed update package and another verifies it, the integration test should show that verification fails when the package is altered, truncated, or delivered out of order. After interface behavior is confirmed, test the complete device under normal use and misuse conditions.
Run System and Regression Tests Before Release
System tests verify the complete software product against the software requirements specification under realistic operating conditions. This is where you check the whole device as it will be used in the field, not just as separate parts on a bench.
Test items should include unauthorized configuration changes, audit logging, rejection of corrupted or unsigned updates, and safe behavior after repeated failed logins or communication failures. Every software requirement should trace to at least one system test, and pass/fail evidence should be kept before release. [7][10]
Any later fix or design change should trigger targeted regression testing before release.
For Class B and Class C software, regression testing helps protect the validated safety and security baseline after change. [9] Each fix should trace back to the requirements and hazards it touches, and nearby controls should also be rerun. For example, if session management changes, rerun authentication and authorization tests too. If any tests are left out, document that choice with a risk-based rationale.
Test-Level Comparison Table
| Test Level | Primary Purpose | Typical Security Focus | Required Outputs | Role in IEC 62304 Evidence |
|---|---|---|---|---|
| Unit testing | Verify individual software units against detailed design or acceptance criteria | Input validation, error handling, crypto/auth logic, boundary conditions | Test procedures, results, defect records, code review/static analysis evidence | Shows each unit behaves correctly before integration |
| Integration testing | Verify units and interfaces work correctly together | Interface hardening, data flow, privilege boundaries, exception propagation, abnormal cases | Integration plan, executed test records, anomaly handling, regression evidence | Demonstrates correct assembly and interaction of components |
| System testing | Verify the complete software system against software requirements | Access control, audit logging, update integrity, safe-state behavior, misuse resilience | Test plan, protocol, report, requirement traceability, pass/fail evidence | Provides end-to-end compliance evidence before release |
Across all test levels, keep procedures, execution records, and results under configuration control. That control keeps the compliance record intact. Record the software version, build identifier, test environment, tool versions, and any stubs, mocks, or simulators used. [6][7][11]
sbb-itb-535baee
Step 3: Document Evidence and Manage Findings
Testing only helps with compliance if someone can review the evidence later and follow what happened. That sounds obvious, but it’s a common weak spot. FDA warning letters often point to poor documentation, including missing, incomplete, or backdated records.[21][22] The job here is simple: turn work from unit, integration, system, and regression testing into a clear record set that an auditor can check without playing detective.
Build the Core Audit Trail for Compliance Testing
After verification, package the evidence so each result ties back to the released build and the risk it covers. The core audit trail should include software development and requirements records, the risk management file, test plans, protocols, and results, the RTM, configuration and release records, SOUP documentation, and problem-resolution files.[15][2][5][16][10]
Each test result should record:
- Test case ID
- Expected and actual results
- Pass/fail status
- Software version and build identifier
- Tool versions
- Environment
- Date
- Tester ID
This level of detail matters because auditors usually ask the same basic thing in different ways: What did you test, on which build, under what conditions, and what happened? These fields answer that fast.[12][13][15][10][18]
The RTM should work in both directions. It should connect requirements to design, code, and test results. And it should also let you trace defects and tests back to the original requirement and hazard. The chain should follow hazard → control → requirement → test → result. If that chain breaks in either direction, auditors often flag it.[17][18][19][20]
Once the baseline record set is done, treat every failure with the same level of care.
Record Anomalies, CAPA Links, and Residual Risk Decisions
Every failed test or anomaly needs its own record. That record should include a unique identifier, a clear description, the affected software item or interface, expected versus actual result, severity or risk impact, and the date discovered.[14][15][8][16][10]
It should also show what happened next: the triage decision, whether the issue went into CAPA or defect management, the fix or workaround used, and whether retesting on a controlled build confirmed closure. That full chain is what makes the problem-resolution file ready for review.
For Class B and C software, unresolved anomalies need extra care. Document the release decision and the risk basis for that decision.[14][15][8][16][10] Spell out what is still open, which compensating controls are in place, who approved the decision, and how that decision matches the risk management file. Be specific with residual-risk rationale. Vague notes like “acceptable risk” usually don’t help much when someone starts asking follow-up questions.
Document-to-Audit-Question Mapping Table
Use this mapping to answer common audit questions fast.
| Audit or Submission Question | Primary Document(s) That Answer It |
|---|---|
| How were security requirements tested? | SRS, test plan, test protocols, traceability matrix |
| Does the evidence match the released version? | Configuration management records, build identifiers, release records |
| How were failures handled? | Problem resolution file, defect records, CAPA documentation |
| Did retesting confirm fixes were effective? | Retest records, regression evidence, closure approvals |
| What issues remain and why were they accepted? | Residual anomalies list, risk evaluation rationale, release decision record |
| How were software changes controlled? | Change control records, version history, regression test evidence |
| How does each control trace to a verified test? | RTM linking hazards → risk controls → test cases → results |
Conclusion: A Practical IEC 62304 Compliance Testing Workflow
IEC 62304 compliance testing ties safety class, risk controls, requirements, verification, and release evidence into one traceable workflow. That chain only holds up when traceability stays in place from start to finish.
Bidirectional traceability links each hazard to a verified result, and back again.[18][23][25]
For vendor-connected software, separate spreadsheets and ticketing systems can break the evidence trail. Censinet RiskOps™ brings risk assessments, documentation, and evidence coordination into one place for healthcare organizations and vendors. The aim is simple: make the evidence trail easier to defend.
Key Takeaways for Healthcare IT and Compliance Leaders
IEC 62304 compliance testing works best when the process is driven by risk. The main outcomes are correct classification, complete requirement-to-test traceability, and release evidence that matches the tested version.[2][24][25] When the evidence trail lives in one place, audits tend to move faster, and safety decisions are easier to defend.
FAQs
How do I determine the correct IEC 62304 safety class?
Determine the IEC 62304 safety class by looking at the harm the software could cause if it fails, and assume a 100 percent chance that the failure happens.
- Class A: no injury is possible
- Class B: non-serious injury is possible
- Class C: failure could cause death or serious injury
Sometimes, external risk controls - like hardware safeguards or physician oversight - can lower the software’s safety class.
What evidence do auditors expect for IEC 62304 testing?
Auditors want plain, checkable proof that security work was planned, built, and tested across the software lifecycle. The single most important item is bidirectional traceability. That means you can follow hazards and threats forward to security requirements, design modules, and verification test cases, and trace them back again.
Typical evidence includes:
- A traceability matrix and test records
- SBOM, vulnerability triage, and VEX documents
- Secure update and boot verification logs
- Architecture, risk management, and tool validation records
How should I handle failed tests before release?
Add each failed test to your problem resolution process and keep full traceability from the first report through the final retest. Do not release the product until the vulnerability has been fixed and the fix has been verified.
Record the failure in your Unresolved Anomaly List. If any minor issue remains, include a risk-based reason for accepting it. If the failure is critical, apply a patch, run regression testing, and document the retest results so there’s a clear record that the issue is resolved.
