
Retiring a medical device is not just a disposal job. It is a security, safety, and enterprise risk compliance task.
If I had to sum up the process in a few lines, I’d say this: assign ownership, track the device, wipe data, remove access settings, clean it, store it safely, choose the right end path, and keep records for at least 6 years.
Here’s the short version:
- Put one workflow in place so Clinical Engineering, IT, Security, Compliance, and Supply Chain all follow the same steps.
- Flag devices that may hold PHI/ePHI, login details, logs, certificates, or network settings.
- Sanitize all data stores using a method that fits the device and the risk.
- Do not rely on factory reset alone. It may leave recoverable data behind.
- Remove access paths like user accounts, API keys, remote access links, and portal registrations.
- Verify each step at the serial-number level with logs, sign-off, and destruction or transfer records.
- Decontaminate before transport or storage to reduce patient and staff risk.
- Pick the final path carefully: internal reuse, resale, donation, recycling, or destruction.
- Keep the full audit trail because HIPAA documentation rules generally mean 6 years of record retention.
A few facts stand out. HIPAA records often need to stay on file for 6 years. NIST SP 800-88 is the main guide for media sanitization. And one missed device record, one skipped wipe check, or one lease return with PHI still on it can turn a retired device into a privacy incident.
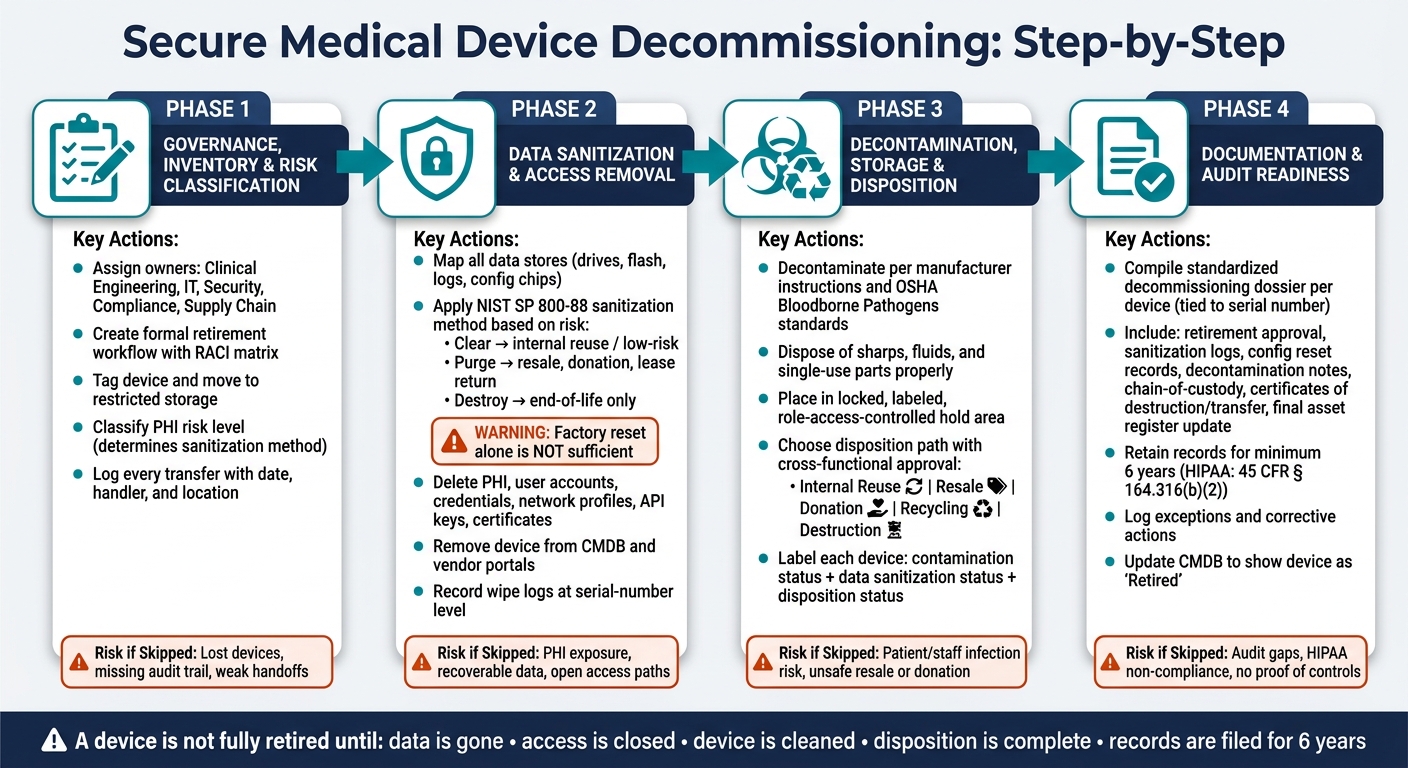
Medical Device Decommissioning: 4-Step Secure Retirement Process
Total Product Lifecycle Security: From Design to Disposal | Ep. 27
sbb-itb-535baee
Quick comparison
| Step | What I’d focus on | Main risk if skipped |
|---|---|---|
| Governance | Clear owner, approval flow, chain of custody | Lost devices, weak handoffs, missing audit trail |
| Data sanitization | Wipe or destroy all storage media | PHI exposure, data recovery |
| Access removal | Delete credentials, certs, network and portal links | Old access paths stay open |
| Decontamination | Clean and label before movement | Infection control and staff exposure issues |
| Final disposition | Match path to risk and support status | Unsafe resale, donation, or reuse |
| Documentation | Keep logs, sign-offs, and certificates | Audit gaps, weak proof of compliance |
In other words: a device is not fully retired until the data is gone, access is closed, the item is cleaned and moved through the right end path, and the paperwork is complete.
1. Set Up Governance, Inventory, and Risk Classification
Once you've picked a device for retirement, the next job is simple in theory and easy to mess up in practice: put someone in charge and control the handoff from start to finish.
Build a formal retirement workflow and chain of custody
Set owners before the device leaves service. Clinical Engineering should own the asset itself. IT should handle the CMDB and network records. Security should review any device that stored PHI or connected to the network. Compliance and Privacy should confirm HIPAA alignment, while Supply Chain should manage lease returns, trade-ins, and financial asset retirement.
A simple RACI matrix across these teams helps keep the process tight. No device should move to the next stage without a documented approval and a timestamp in the CMMS/CMDB.
Your policy should also spell out what triggers retirement. Common triggers include:
- End of support
- Security gaps that can't be patched
- Repeated safety failures
- Repair costs that are higher than replacement value
When one of those conditions is hit, the system should automatically create a "Retirement Candidate" work order and send it to the asset owner and security lead for review.
After that, tag the device, move it into restricted storage, and log each transfer with the date, the handler, and where it went. Think of it like a hospital-grade handoff log: if a question comes up later, you should be able to trace every step without guessing.
Identify devices that store PHI, credentials, or configuration data
Not every device brings the same level of risk. Start with the ones most likely to hold data or settings you can't afford to leave behind: imaging systems, bedside monitors, smart pumps, implant programmers, and lab analyzers.
For each device, the asset record should include the storage type, connectivity, and planned disposition. It should also include fields for PHI risk level and planned disposition so the system can apply the right sanitization and verification steps. The PHI risk level assigned here directly determines the sanitization method and verification required in the next section.
Centralize risk tracking across teams
Use one shared workflow to route retirement tasks, collect wipe evidence, and keep the audit trail in a single place. That cuts down on scattered records and makes reviews much less painful.
Organizations handling decommissioning as part of a broader cyber risk program can use Censinet RiskOps™ to centralize device-level risk assessments and store evidence such as wipe logs, certificates of destruction, and vendor attestations.
Once ownership, inventory, and risk level are set, the device is ready for data removal and configuration reset.
2. Remove Data and Reset Security-Relevant Configurations
Sanitize the device before it leaves your control. Then remove network, user, and integration settings so no credentials or access routes are left behind.
Find all data stores and select the right sanitization method
Use the risk level assigned during inventory to pick the sanitization method and how deeply you need to verify it. The OEM service manual should help you map every storage location, including internal drives, embedded flash, logs, and configuration chips.
Once you know where data lives, apply the right method based on NIST SP 800-88. That’s the same standard HHS OCR ties to HIPAA-compliant disposal of ePHI.[6][7]
| Method | Security Level | Supported Media | Reuse Suitability | Verification Required |
|---|---|---|---|---|
| Clear | Protects against casual access and basic recovery tools | HDDs and removable media | Internal reuse of low-risk devices | Review tool logs, confirm no PHI visible |
| Purge | Protects against advanced forensic tools and lab analysis | HDDs, SSDs (cryptographic erase), embedded flash via OEM tools | Resale, donation, or lease return | Tool logs, spot checks, confirm no org identifiers remain |
| Destroy | Prevents any data recovery | All media types | No reuse - end-of-life only | Certificate of destruction from vendor or internal facilities |
Factory resets are not enough. They often remove only pointers, not recoverable data.[4]
Delete PHI and remove network, user, and integration settings
After you’ve mapped the data stores, remove every access setting that could still open a door. Clear PHI, metadata, logs, user accounts, credentials, network profiles, and interface settings.[4]
Then check your CMDB and vendor portals. Remove the device, revoke certificates and API keys, and deregister remote access. If the device still shows up in a portal somewhere, that’s a loose end worth fixing now, not later.
Verify the wipe and record evidence at the serial-number level
Verification is what turns sanitization into proof. Collect wipe logs, confirm the device no longer contains PHI or credentials, and document the result. If physical destruction is used, get a certificate of destruction from the service provider that lists the method, date, and media types processed.
Record everything at the serial-number level in your CMMS/CMDB. Each record should include:
- Device model and serial number
- Media types sanitized
- Sanitization method for each media type
- Date and time
- Responsible technician
- Approver sign-off
- Verification result
HIPAA documentation retention rules mean these records should be kept for at least six years.[3][5] High-risk devices, such as imaging systems or critical care monitors, should also get an independent review before moving forward. In most cases, that means sign-off from clinical engineering or information security.
Once verification is done, move the device to decontamination and restricted storage.
3. Handle Decontamination, Storage, and Final Disposition
After data sanitization is verified, finish decontamination and decide what happens to the device next. If you skip either step, you leave room for patient harm, staff exposure, and compliance trouble.
Decontaminate devices and move them to restricted hold area
Before any device leaves a clinical area, clean and decontaminate it based on the manufacturer's instructions and your facility's infection control rules. Devices that have come into contact with blood, body fluids, or mucous membranes usually need high-level disinfection or sterilization before they can be removed from patient care areas. OSHA's Bloodborne Pathogens standards also require contaminated equipment to be decontaminated or clearly marked with biohazard labeling when full decontamination isn't possible.[8][13][15]
Start by removing consumables, sharps, and biological materials. Needles and lancets belong in approved sharps containers. Fluids should be disposed of under hazardous-waste policies. Single-use parts should go through the proper clinical waste stream.
If a device has internal contamination or fluid intrusion that can't be cleaned, bag it, label it clearly, and send it to technical services. If it's beyond repair at a reasonable cost, take it out of service and send it for certified destruction.[8][16]
Once the device is decontaminated, place it in a locked, clean, dry hold area with role-based access and logging until disposition is approved. Label each device with its contamination status, data sanitization status, and disposition status.[13][14][17] At that point, the team can approve the next step.
Choose the right disposition path: reuse, resale, donation, recycling, or destruction
Use the device's risk level and support status to pick the safest disposition path with the lowest practical risk. This decision shouldn't sit with one team alone. Clinical engineering, IT security, compliance, and supply chain should all review and approve it, and sanitization plus configuration resets need to be fully done before any outside transfer.[2][9][10][11][12]
Here are the main paths and the controls that go with each one:
| Disposition Path | Cybersecurity Risk | Environmental Impact | Complexity | Documentation Needs | Verification Required |
|---|---|---|---|---|---|
| Reuse (internal) | Moderate - device must re-enter managed inventory with updated security baselines | Positive - extends device life, reduces waste | Moderate - reassignment, retesting, revalidation required | New location, owner, clinical validation, ongoing maintenance records | Confirm data wipe, security config, and safe operation before redeployment |
| Resale | High if sanitization is incomplete - strong proof of wipe is mandatory | Positive - extends device life for recipients | High - contracts, valuation, reseller coordination | Sanitization evidence, transfer of ownership, residual warranty/support info | Third-party attestations or certificates of data destruction and functional testing |
| Donation | Similar to resale - recipients may have limited security resources | Positive - aligns with corporate social responsibility goals | Moderate to high - vetting recipients, logistics, possible export controls | Donation agreements, sanitization records, device condition statements, acknowledgment of receipt | Data removal confirmed, basic safety checks completed |
| Recycling | Lower if storage media are destroyed or sanitized before recycling | Highly positive when using certified e-waste recyclers | Moderate - certified vendor coordination, hazardous materials classification | Chain-of-custody records, recycling certificates, data destruction certificates | Confirm recyclers follow agreed data destruction and environmental standards |
| Destruction | Minimized - physical destruction eliminates data recovery potential | Depends on disposal methods; certified vendors reduce negative impact | Moderate - logistics and vendor oversight required | Destruction method, date, vendor certifications, serial-number-level tracking | Witness destruction, obtain certificates, reconcile asset records |
Before the device leaves restricted storage, record the chosen disposition, the custodian, and the transfer date.
4. Document Compliance, Audit Readiness, and Process Improvement
Once the disposition decision is made, the next job is simple in theory and easy to botch in practice: close the record trail.
Keep the records auditors and compliance teams will expect
At final disposition, pull together the full decommissioning record for audit review. Under the HIPAA Security Rule, documentation generally must be kept for 6 years under 45 CFR § 164.316(b)(2), so each decommissioning file should be stored with that retention period in mind.[18][20][21]
For every retired device, keep a standardized decommissioning dossier tied to the asset ID - such as a serial number or asset tag - and linked to the enterprise asset register. At a minimum, the file should include:
- Retirement approval: formal sign-off from clinical engineering, IT security, and compliance, plus the business reason and risk assessment.
- Asset identifiers and risk classification: the device's role, data classification, and criticality rating from the risk register.
- Sanitization logs: date, method, tool version, operator, and verification result.[1][19]
- Configuration reset records: proof that network settings, user accounts, API or integration credentials, and remote access settings were removed or reset.
- Decontamination and safety notes: proof of cleaning or clearance before transport.
- Chain-of-custody records: each handoff, storage location, and transfer to outside vendors.
- Certificates of destruction or transfer: vendor-issued certificates for shredding, recycling, or secure destruction, or internal confirmation for reuse, resale, or donation.
- Final asset register update: confirmation that the CMDB and medical device inventory show the device as retired, along with the disposition method.
One standard template, mapped to HIPAA, NIST, and internal audit needs, makes review much easier. It gives auditors a clean path to check controls instead of forcing them to piece the story together from scattered records.
NIST SP 800-88 recommends a certificate of media disposition for each sanitized piece of electronic media.[1][19] And when something goes off script - a wipe fails, a serial number can't be confirmed, or a vendor handoff doesn't follow the usual path - log the exception, the corrective action, and the person who approved it.
When the file is complete, use it as more than a paper trail. It should also help confirm the process worked and show where exceptions keep appearing.
Use decommissioning data to strengthen risk operations
After the record is closed, track the numbers that tell you whether the process is holding up: PHI-bearing retirements, time to sanitization, and exception rates. Those measures can show weak spots fast.
Near misses often tell you more than clean runs. A retired device that is still connected to the network, or one sitting in unsecured storage with residual PHI, points to a gap that needs attention before it turns into a privacy or security problem. That feedback should go back into governance through policy updates, focused training, or extra controls like dual sign-off for high-risk devices.
Censinet RiskOps™ supports this type of centralized oversight by linking decommissioning workflows to risk registers, PHI classifications, and device lifecycle data. In plain terms, the evidence gathered during retirement can flow straight into enterprise risk assessments, benchmarking, and medical device cybersecurity management across the organization.
Conclusion: Key steps for retiring medical devices securely
Secure decommissioning is not one checkbox at the end of a device's life. It's a step-by-step process that starts before the device is unplugged and does not stop until every record is filed and the asset register is updated.
Start with governance and a formal retirement workflow. Classify each device by the data it holds and the risk it carries. Sanitize every data store with a method that fits the device's risk level. Reset all security-related settings, and verify both actions with documented evidence tied to the serial number. Handle decontamination and storage with care, then choose the disposition path with cross-functional approval. Throughout the process, keep a complete, tamper-evident record that can support HIPAA compliance, OCR review, and internal audit sampling. Secure decommissioning ends only when the records are complete, the asset register is updated, and the workflow is ready to be used again.
FAQs
Which medical devices are most likely to store PHI or credentials?
Many devices can hold PHI or login details. That includes desktops, laptops, tablets, servers, and smartphones.
It also includes infrastructure gear and the devices people often miss, like network storage, digital copiers, multifunction printers, and infusion pumps. If a device has internal storage - such as an HDD, SSD, SD card, or embedded flash - it can keep data, system settings, network trust relationships, and credentials.
How can we verify a factory reset actually removed sensitive data?
A factory reset alone usually isn't enough. It can leave cached files, logs, or data in embedded storage behind.
If you need to make sure ePHI can't be recovered, use approved data-wiping tools or cryptographic erasure.
Then check that the data is gone. You can do that with read-back checks, hash comparisons, or forensic sampling.
If you can't fully verify sanitization, physical destruction, such as shredding, is the safest option. And for compliance, always get a signed Certificate of Destruction.
What records should we keep to prove compliant decommissioning?
Keep an audit-ready record for each device. For every item, document:
- device identifiers, PHI/ePHI risk level, and the decommissioning trigger
- the sanitization method, plus the tools or commands used
- the date and time, staff involved, and verification results
- any exceptions or corrective actions, the final disposition, chain-of-custody details, and disposal or approval records
Retain these records for at least six years.
