
If a device issue shows up after release, I need a clear 5-step path: log it, confirm it, fix it, tell customers, and close the case with records.
In healthcare, delays can affect care, not just IT. The article points to 18 FDA cybersecurity communications for medical devices from June 2013 to January 2025. That’s why I’d treat post-market disclosure as a set process, not a case-by-case judgment call.
Here’s the article in plain terms:
Quick comparison
Step
Main goal
What I focus on
1
Intake
One channel, one owner, fast acknowledgment
2
Validation
Reproduction, affected versions, patient impact
3
Remediation
Safe fix, testing, rollback, release control
4
Disclosure
Customer notice, timing, advisory content
5
Closure
Records, reportability review, lessons learned
Bottom line: I’d read this article as a workflow for turning a messy device security issue into a tracked, timed, documented response that stands up to customer, quality, and FDA review.
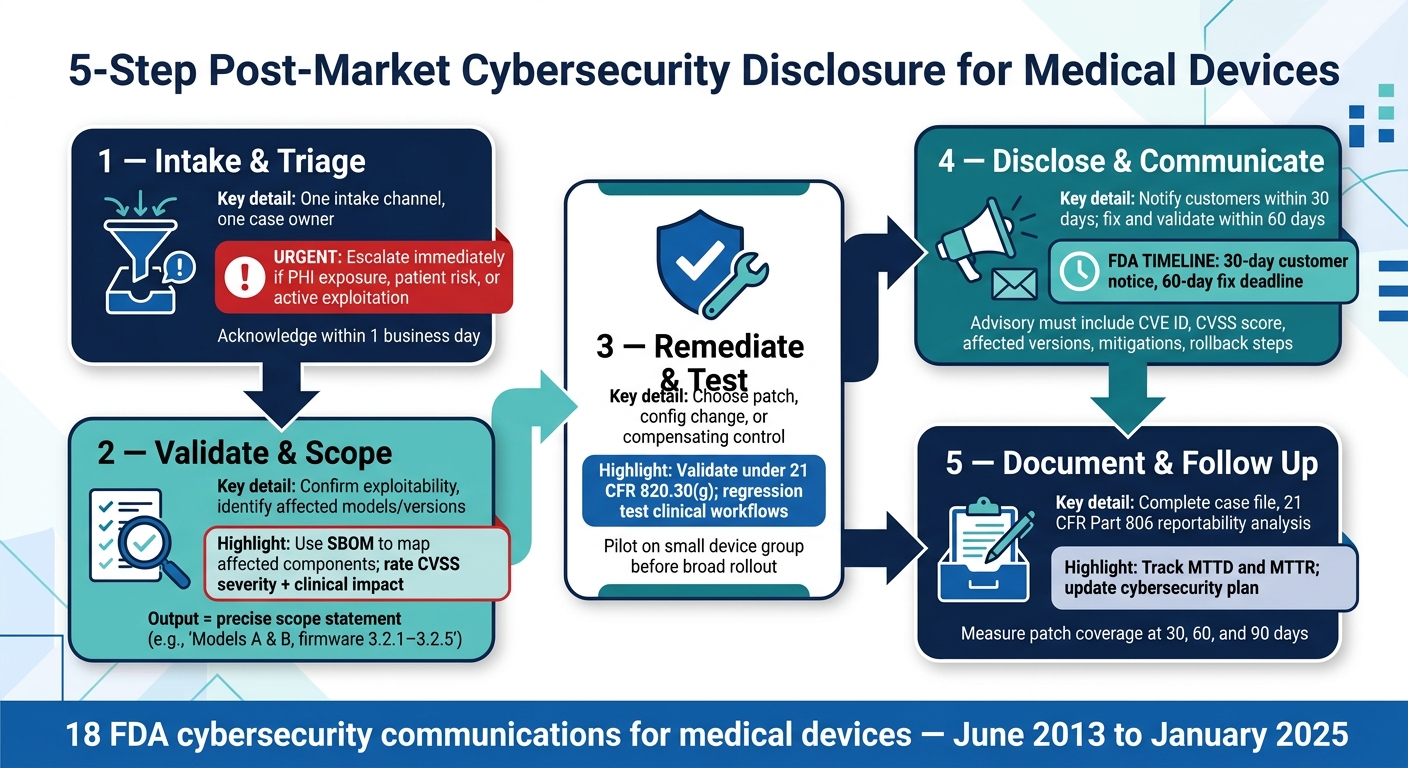
5-Step Post-Market Cybersecurity Disclosure Process for Medical Devices
Module 8 Postmarket Cybersecurity and Vulnerability Disclosure
sbb-itb-535baee
Step 1: Set up intake and triage for vulnerability reports
A missed vulnerability report can turn into a patient-safety problem fast. That’s why every report needs one owner and one response path. Set up a single intake path so each report gets assigned right away. That intake path then feeds the next step: validation and risk assessment.
Define reporting channels and acknowledgment rules
Publish one monitored security contact and one web form. The form should gather the details your team needs to triage fast:
Adding a PGP public key gives people a way to send encrypted submissions. Put these channels on your website, product documentation, and support pages.
Each submission should trigger a prompt acknowledgment, ideally within one business day. That message should include a case ID, a brief thank-you, the expected next steps, and a note that timelines may shift if more evidence is needed. Clear acknowledgment keeps the disclosure process cooperative and predictable. It also creates the starting record for triage.
Assign triage ownership and escalation paths
PSIRT should own intake and initial triage. After that, the work splits by function. Engineering checks technical feasibility and root cause. Quality looks at process impact and corrective-action needs. Regulatory reviews reporting duties. Communications gets customer notices ready if disclosure is needed.
Set these roles before reports start coming in. If you wait until a live issue lands, things can get messy in a hurry.
Reports tied to active exploitation, PHI exposure, loss of essential function, or a credible patient safety risk should be escalated at once. Urgent cases also need an after-hours escalation path.
Intake sources and required actions at a glance
Handling changes based on where the report comes from. The table below maps each intake source to the initial owner, required evidence, urgency level, and next action.
External researcher
PSIRT
Reproduction steps, affected version, proof-of-concept details
Medium–High (escalate if patient care may be affected)
Acknowledge promptly; route to engineering validation
Customer report
Support + PSIRT (copied)
Logs, timestamps, device identifiers, operational impact
High if patient care is affected
Escalate if clinical impact is suspected; open the case immediately
Internal detection (SOC, QA, red team)
PSIRT
Telemetry, alert history, incident context
Medium–Critical based on patient care exposure
Open the case; assign an engineering lead; assess scope
Regulator notice
Regulatory Affairs + PSIRT
Notice source, cited concern, response deadline
High
Log the deadline and brief senior leadership
Each row in that table should tie back to a case record in your single case system, with one unique ID, one visible owner, and one clear next step. Log every report in one system of record so the case ID, owner, evidence, and next action stay together. Once the report is routed, move to exploitability, scope, and clinical impact.
Step 2: Validate the Issue and Assess Scope and Risk
After triage, you need to confirm two things: is the issue real, and exactly which devices does it touch? That check matters. Good validation keeps the response in proportion and helps your communications hold up under scrutiny.
Verify Exploitability and Affected Versions
Reproduce the issue under the same conditions described in the report. Save logs, screenshots, and packet traces as you go. If you can reproduce it, narrow down the root cause, whether that's a third-party library, a service, or an exposed interface. If you can't reproduce it right away, change the authentication state and network segmentation, then attach each test attempt to the case record.
Next, use your SBOM to find every product and version that includes the affected component. Then compare that against firmware and software configuration data so you can split devices into two groups: those that are technically vulnerable, and those where the function is turned off or not reachable. After that, pull your installed-base records, including serial numbers, deployment locations, customer ownership, and connectivity status, to build a precise scope statement.
A line like affects Models A and B running firmware 3.2.1 through 3.2.5 in network-connected configurations gives downstream teams something they can act on. A vague product-family label doesn't.
Once exploitability is confirmed, shift to severity and clinical impact.
Rate Cybersecurity Severity and Clinical Impact
Technical severity alone doesn't tell the full story for a medical device. You need to rate both exploitability and possible patient harm to decide whether the risk is controlled or uncontrolled.[2][3][4][5]
Start with patient harm. Ask direct questions:
Write out the clinical scenarios in plain terms, including the care setting and level of supervision. That reasoning matters just as much as the numeric score. Auditors and regulators will look closely at that later.
For exploitability, use a structured scoring method such as CVSS with MITRE's FDA-qualified medical device rubric, which is specifically tuned for patient-centric impact in time-sensitive postmarket disclosure decisions.[6][7][8] Look at attacker prerequisites, such as physical access versus network reachability, attack complexity, and any compensating controls already in place. Network segmentation, access control lists, and application whitelisting can lower effective exploitability in an actual hospital setting.[5][6]
Wrap up this step with a short case summary covering exploit preconditions, affected versions, the combined risk rating, and any remediation constraints.
Step 3: Plan Remediation and Validate the Fix
Once you’ve confirmed the vulnerability, assigned a severity rating, and nailed down the scope, the next step is simple on paper: pick the right fix and make sure it’s safe to ship. That’s where teams can get into trouble. A rushed patch can cause fresh problems. But dragging out a stopgap measure for too long can leave patients and systems exposed.
Choose a Patch, Configuration Change, or Compensating Control
Use a patch when it fixes the root cause and can be applied safely. Use a configuration change when the problem comes from optional settings or unnecessary exposure. Use a time-bound compensating control when patching right away isn’t practical, such as when regulatory limits, third-party dependencies, or the chance of disabling legacy devices in the field get in the way.
A compensating control is a temporary way to cut risk, not a permanent answer. If you put one in place, set a time limit, document it, and pair it with a clear remediation plan and target date for the permanent fix.
Use the Step 2 risk ranking to decide what gets fixed first. Look at clinical criticality, exposure, and downtime tolerance. In practice, that means prioritizing devices by:
Then move on the highest-risk fleet first.
Once you’ve chosen the fix, test it against real clinical workflows before release. That part matters. A change that looks fine in a lab can still create headaches on the floor.
Test Release Readiness Before Deployment
Treat the fix as a design change and validate it before distribution. Under 21 CFR 820.30(g), software validation is required before distribution, with documented test plans, results, and a clear rationale showing that the change mitigates the vulnerability without introducing new hazards.[2][9]
At a minimum, re-run the test cases that first exposed the issue. Then run regression testing across core clinical workflows, alarm behavior, data exchange with connected systems such as EHRs, PACS, and LIS, and logging functions.
Before deployment, check the release from security, clinical, quality, and deployment angles. Verify:
It also helps to pilot the fix on a small, controlled device group before broad rollout. Back up device configurations before applying any fix, and write rollback procedures clearly so clinical engineering teams know exactly what to do if something goes wrong after deployment.
Schedule updates during maintenance windows so active patient care isn’t disrupted. After each update, verify device function on-site before moving to the next location.
Urgent fixes should be handled separately from routine updates, and the reason for that choice should be documented. A remotely exploitable vulnerability on a life-supporting device should not sit around waiting for the next scheduled release cycle.
Step 4: Coordinate Disclosure and Customer Communication
Once the fix or control is validated, move straight into coordinated disclosure. At that point, the problem shifts. It’s no longer just about the flaw itself. Now the team has to decide when to speak, what to say, and who needs to hear it first. That choice affects patient safety, compliance, and trust.
Align Disclosure Timing with the Reporter and Internal Teams
The FDA’s postmarket cybersecurity guidance sets a firm benchmark: tell customers about the vulnerability and remediation timeline within 30 days of learning about the issue, then fix and validate the change within 60 days. If both deadlines are met, the FDA generally does not plan to enforce certain device reporting rules.[2] The HSCC Joint Security Plan Version 2.0 points in the same direction. It recommends that manufacturers contact customers within 30 days to identify affected devices, share interim controls, and lay out a remediation plan.[11]
Before anything goes public, run timing through a few basic checks:
Once those gates are cleared, the team can draft external communications.
This is also where cross-functional sign-off earns its keep. Engineering and product teams prepare the technical summary. Security and clinical risk owners turn that into plain-language risk information customers can act on. Legal and regulatory teams check it against prior FDA statements and reporting needs. Communications then tightens the wording and makes sure the message is clear.
To stop this from dragging on, set review targets in advance. For example:
Use one workflow for draft routing, approvals, and final record storage. If teams are hunting through email threads during a live issue, things can get messy fast.
When a security researcher or healthcare delivery organization reported the issue, keep them informed. Share the target timeline. Update them at key milestones. Give them a chance to review the technical accuracy of the advisory before release. Use a mutually agreed disclosure holdback while remediation is underway. That kind of coordination helps keep the advisory accurate and cuts down on last-minute edits. If active exploitation or an immediate patient safety risk changes the situation, explain why earlier disclosure is needed, even if a full patch is not ready yet.[10]
Write Advisories with the Details Customers Need
Once timing is set, turn the case into a customer-facing advisory. The notice should include the facts customers need to make decisions without guessing: product, model, software version, vulnerability type, attack vector, CVE ID, CVSS score, clinical impact, affected versions, mitigations, validation steps, rollback steps, downtime, and contact details.
It should also spell out differences by care setting. A mitigation that works fine in an inpatient hospital may land very differently in an ambulatory clinic, home-use device setup, or ambulatory surgery center. That context matters.
Add the date of issuance, the advisory version number, and an update history. Customers should be able to tell at a glance whether they’re reading the latest guidance or an older draft that’s already been replaced.
Types of Disclosure Notices and When to Send Them
Use the notice type that fits the risk and the audience. Under pressure, teams don’t have time to debate basic routing, so this should already be mapped out.
Communication Type
Primary Purpose
Typical Audience
Common Trigger
Expected Timing
Customer security advisory
Inform customers of a validated vulnerability and available mitigations
CISOs, IT security, biomedical engineering, clinical leadership
Validated vulnerability with mitigation or patch identified
When mitigation is ready; earlier if interim controls exist
Urgent safety communication / field safety notice
Address vulnerabilities with potential direct patient safety impact
Clinical leaders, risk management, patient safety officers, regulators
High-severity risk to patient safety or critical clinical services
As soon as risk is understood and minimum mitigations are defined, even if full fix is pending
Regulatory notification / report
Fulfill postmarket reporting obligations
FDA and other applicable regulatory bodies
Thresholds met for reportable events or significant cybersecurity issues
Timeframes dictated by regulation
Public web advisory
Provide transparent, broad disclosure
General public, third-party assessors, security researchers, industry partners
Vulnerability of broad interest or coordinated disclosure commitment
Aligned with or shortly after customer advisories; coordinate with the reporter when needed
Technical bulletin / hardening guidance
Share best practices and lower-risk configuration changes
IT, security, and biomedical engineering teams
New hardening guidance, recurring misconfigurations, or low-risk weaknesses without immediate threat
Scheduled guidance; not incident-specific
Define ownership and trigger criteria for each notice type before an incident starts.
Step 5: Close the Case with Documentation and Follow-Up
Once the advisory is out, the case isn't done yet. The last step is to finish the record, confirm any remaining duties, and make sure the team learns from what happened. Close the case only when the file is complete, reporting duties have been checked, and key lessons have been saved for later use.
Retain Evidence and Evaluate Reporting Obligations
At closure, gather a full case file. That should include the original vulnerability report or incident ticket, communications with the reporter and affected customers, the root cause analysis, affected device models and software versions, the risk and clinical impact assessment, remediation actions with implementation dates, validation test results, and a formal closure statement approved by cybersecurity and quality or regulatory leads. [2][1][13]
You also need a written 21 CFR Part 806 reportability analysis for every field correction. Decide whether the action counts as a reportable correction or removal, or whether it falls under FDA enforcement discretion. If the action is a routine cybersecurity update or patch, write down why it should be treated as nonreportable under enforcement discretion. If you rely on enforcement discretion, document that no serious injury or death occurred, risk was reduced to an acceptable level, and users were notified within 30 days. [3][12][14]
Update the Cybersecurity Plan and Monitor for Recurrence
After closure, run a short lessons-learned review. Look at how fast the issue was detected, where triage slowed down, how long it took to identify affected devices, and whether the advisory gave customers clear enough guidance to act. Track concrete metrics such as mean time to detect (MTTD), mean time to remediate (MTTR), and the share of affected devices patched within 30, 60, and 90 days. [2][1]
Then feed those findings back into the postmarket cybersecurity plan. Update threat models to reflect newly observed attack vectors, refine SBOM tracking so future scoping is faster, and tighten escalation criteria for issues tied to clinical impact. [2][1]
Conclusion: The Five-Step Workflow for Reliable Post-Market Disclosure
A disciplined post-market cybersecurity disclosure process comes down to five repeatable steps: structured intake and triage, thorough validation and risk assessment, tested remediation, coordinated disclosure and communication, and complete closure with documentation and follow-up. Skip one, and you leave a gap that can show up during a live incident, a regulatory review, or a customer audit.
FAQs
Who should own post-market vulnerability intake?
The manufacturer’s PSIRT should own post-market vulnerability intake, triage, and escalation. In plain English, that means PSIRT is the main hub for vulnerability reports, whether they come from internal teams, customers, or external security researchers.
The PSIRT Lead coordinates the response and any required regulatory notifications, with help from security, regulatory, and product teams. Manufacturers should also name a clear owner and deputy in the QMS so there’s no confusion about who’s in charge if an issue comes in.
How do I judge cyber risk versus patient risk?
Judge cyber risk against patient risk, not just technical scores like CVSS v4.0.
A CVSS score can tell you how serious a flaw looks from a security standpoint. But it doesn't tell you the part that matters most in healthcare: could this issue affect patient care? That's the key line to draw.
Use ISO 14971 inside your clinical risk management framework to assess the actual clinical impact of a vulnerability. In plain terms, look at how the flaw could lead to patient harm, not just how easy it is to exploit.
Your review should cover:
This gives you a fuller picture. A technical issue that looks severe on paper may have limited patient impact. On the flip side, a flaw with a lower technical score could still create serious care disruption if it affects diagnosis, treatment, monitoring, or device availability.
Document each step clearly within your risk management process so you can show how the vulnerability was assessed, what controls were applied, and why the remaining risk is acceptable.
What if a fix isn’t ready within 30 days?
Don’t stay silent. Notify customers within 30 days after you identify a major uncontrolled vulnerability, even if the final patch isn’t ready yet.
Spell out any compensating controls, assess the residual risk, and keep in touch with the reporter and the right stakeholders. If patching is delayed, record who approved that delay and what escalation triggers apply so post-market actions stay aligned with the original risk analysis.
