
If a device sends the right data at the wrong time, to the wrong system, or without proper protection, testing has failed.
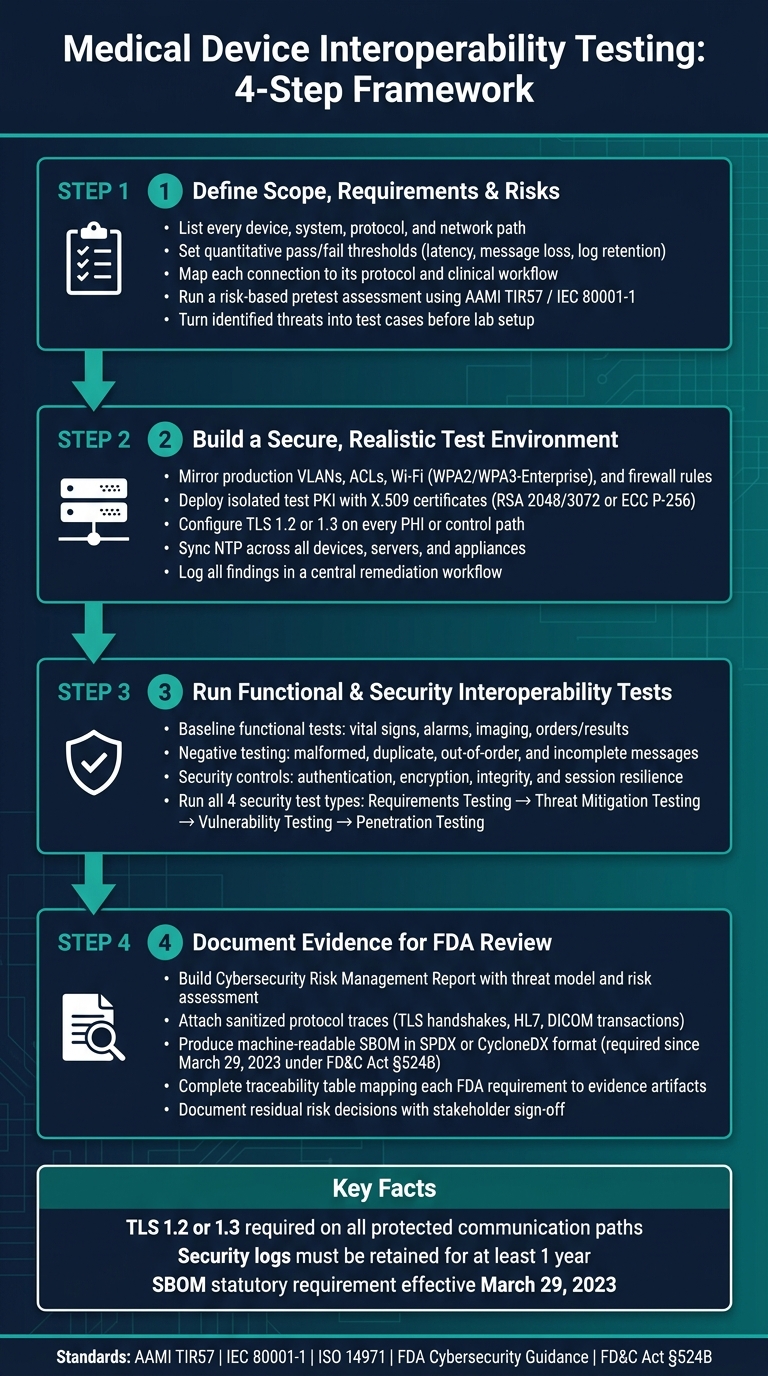
I’d sum up the article like this: interoperability testing has to prove four things at once - the data is correct, the full message arrives, the connection is protected, and every result is written down for review. That means I would test the interface itself, the network path, the identity checks, the logging, and the failure cases before any go-live or FDA submission.
Here’s the short version:
- Start with scope. List every device, system, protocol, workflow, and network path.
- Set pass/fail rules early. Define hard limits for latency, message loss, certificate use, and log retention.
- Build a lab that matches production. Use the same VLANs, Wi‑Fi settings, ACLs, certificates, and time sync.
- Test both normal and broken conditions. Send valid traffic, then send bad, delayed, duplicate, and incomplete messages.
- Check every security control. Verify TLS 1.2/1.3, mutual authentication, certificate handling, integrity checks, and session recovery.
- Run four security test types. Requirements testing, threat mitigation testing, vulnerability testing, and penetration testing each show different proof.
- Keep a traceable record. Tie each finding back to a known risk, the affected component, and the final risk decision.
- Prepare FDA-ready evidence. Include the risk report, architecture diagrams, protocol traces, test records, and a machine-readable SBOM under section 524B.
A few facts stand out. The article points to TLS 1.2 or 1.3 for protected paths, says security logs should be kept for at least 1 year, and notes that the SBOM requirement for cyber device premarket submissions has been in effect since March 29, 2023. It also makes a clear point: patient safety risk and cyber risk often come from the same interface weakness.
If I were explaining the article in one line, I’d say this: test the clinical workflow, test the security controls on every path, and keep proof that links each result to risk and remediation.
Medical Device Interoperability Testing: 4-Step Framework
How to Integrate Medical Devices with EMR/EHR Systems
sbb-itb-535baee
Step 1: Define Interoperability Scope, Requirements, and Risks
Before you test anything, put the full picture on paper. That means every device, system, interface, data flow, clinical workflow, and security requirement belongs in one scope document. This document becomes the anchor for all secure communication checks that come next. After that, map each connection to the protocol and control set it has to pass.
Map Systems, Interfaces, and Communication Protocols
Your scope should list every connected device, clinical system, and network path. That includes wired Ethernet, Wi‑Fi, VLANs, and VPNs used for remote access.[7][13]
The table below links the most common protocols to their clinical role, the security controls to test, and the standards or FDA guidance that shape the requirements.[7][13][14]
| Protocol / Technology | Interoperability Purpose | Security Controls to Test | Relevant Standards / FDA Guidance |
|---|---|---|---|
| HL7 v2 | Exchange orders, results, and observations between devices and the EHR | TLS, message authentication, interface logging | HL7 specs; FDA interoperability guidance on data types and interfaces[7][14] |
| DICOM | Transfer imaging studies and metadata to PACS and the EHR | TLS, access control to image archives, integrity checking | DICOM security profiles; FDA cybersecurity guidance on data in transit and at rest[7][13] |
| IEEE 11073 | Standardized device data models and semantic representation | TLS, mutual authentication, authorization controls | FDA-recognized consensus standards; FDA interoperability guidance[12][14] |
| TCP/IP + TLS / DTLS | General device-to-network communication | Mutual authentication, approved cipher suites, no protocol downgrade | FDA cybersecurity guidance; IEC 80001-1[6][3] |
| VPN | Secure remote access for servicing, monitoring, or telehealth | Strong endpoint authentication, restricted access, session logging | IEC 80001-1; FDA cybersecurity guidance[9][11] |
For each connection, document one clinical scenario. For example, ICU alarms might move through middleware and then land on mobile nurse devices. That kind of plain, concrete mapping helps you test what actually happens in care delivery, not just what the network diagram says. Once the protocol map is done, define the pass/fail thresholds each path must meet.
Set Security and Performance Acceptance Criteria
Acceptance criteria should be quantitative and binary: pass or fail. No gray area.
For authentication, every device-to-system connection that handles PHI or control commands must use mutual authentication based on X.509 certificates or other strong credentials. You also need a set threshold for failed handshake attempts before an alert fires.[6][3] Use strong, approved TLS settings, and treat any plaintext fallback as a failed result.
Set hard latency limits for alarms and charting. Also require zero silent loss for high-risk commands such as infusion pump start/stop.[3] Security events should be logged in local U.S. time and kept for at least 1 year.[3]
Run a Risk-Based Pretest Assessment
A pretest risk assessment turns known threats into test scenarios before the lab setup even starts. AAMI TIR57 gives the framework for security risk management in the context of ISO 14971, while IEC 80001-1 lays out responsibilities and risk activities when devices connect to clinical IT networks. It covers safety, effectiveness, and security together.[8][9][11]
Take each communication path and turn it into threat-driven test cases before you build the lab. Replay attacks, man-in-the-middle exposure caused by bad TLS certificate validation, misrouted patient data from wrong interface mappings, certificate expiration, unsupported TLS versions on legacy devices, and plaintext fallback all need direct analysis as failure modes.[6][3][8][9] Each threat you identify should connect to a test case in Step 3.
Step 2: Build a Secure and Realistic Test Environment
Build a lab that mirrors production closely enough to expose the failures you identified in Step 1. If the lab doesn’t reflect actual clinical conditions, it won’t surface the failure modes that matter. The goal isn’t a generic integration demo. It’s a test setup built around the threat cases you already mapped.
Configure Devices, Peer Systems, and Network Segments
Mirror the target hospital network as closely as possible. In practice, that means using separate VLANs for medical devices under test, simulated clinical systems, and test management tools. Apply ACLs and firewall rules that match production policy. Each device class should sit on the same network segment it uses in production.
Use nonproduction peer systems for EHR, PACS, interface engines, and alarm routing. Then use simulators to trigger malformed messages, delayed acknowledgments, and traffic bursts without touching live data. Stick to synthetic or de-identified data only.
If the device uses Wi-Fi, copy the production SSID, WPA2/WPA3-Enterprise settings, and 802.1X setup on a dedicated test SSID tied to the test VLAN. Then test roaming, weak-signal behavior, and handoff failures under realistic RF conditions.[20]
Once the network path looks like production, lock down identity, certificates, and logging.
Set Up Certificates, Access Controls, and Audit Logging
Deploy an isolated test PKI with root and intermediate CAs. Issue X.509 certificates to devices, servers, and gateways using RSA 2048/3072 or ECC P-256. Configure TLS 1.2 or 1.3 on every PHI or control path, and test how the system behaves with expired, revoked, and untrusted certificates.[18][16]
Use a nonproduction directory with role-based groups for clinical, biomed, IT, and vendor access. Keep service accounts scoped to their job, and log authentication, configuration changes, and privileged actions to a central syslog collector.[17][3]
Configure NTP across devices, servers, and network appliances. If clocks drift, log review turns into guesswork. Synchronized time is required to correlate device, server, and network logs.[19][20]
After those controls are in place, record every result in one remediation workflow.
Track Findings and Residual Risk in a Central Workflow
Log every defect, failed test case, and open remediation task in a single workflow. Track the severity, owner, due date, and residual risk disposition for each finding. Link each one back to its Step 1 threat scenario so traceability stays intact.
That traceability is what turns a pile of test results into FDA documentation you can stand behind.
With the lab stable and traceable, run the functional and security tests in Step 3.
Step 3: Run Functional and Security Interoperability Tests
Start with functional interoperability. Then move to the security controls that protect each exchange. That order matters because it makes troubleshooting faster and more exact. If the data flow is already working, it's much easier to spot whether a failure comes from security settings or from the exchange itself.
Run Baseline Functional Interoperability Tests
First, prove that each planned data exchange works end to end. The device should connect to the peer system, send and receive the right data, and keep patient and device identity correct across the exchange. Focus on the main workflows: vital signs, alarms, imaging, and orders/results.[24]
After the data flow is working as expected, test the controls that protect it.
Negative testing matters just as much as the happy path. Intentionally send malformed, incomplete, out-of-order, and duplicate messages to make sure the system rejects, quarantines, or logs bad input without corrupting clinical state or linking data to the wrong patient or device. Include cases such as:
- Missing patient identifiers
- Truncated payloads
- Invalid timestamps
- Unsupported command fields
- Payloads with unexpected values
Record pass/fail results for each case so you can show that the device stays safe under each fault condition.[7][21]
Test Authentication, Encryption, Integrity, and Resilience
Once functional behavior is confirmed, validate the security controls on every communication path. Check that only authorized devices or systems can establish a session, that certificates chain correctly, and that the system rejects expired, revoked, or untrusted certificates. Save protocol traces that show the negotiated cipher suites and key lengths, not just proof that a connection happened.[7][3]
Integrity and resilience testing often gets skipped, and that's a mistake. Verify that message integrity protections detect tampering, that session timeouts fire as expected, and that the device re-authenticates cleanly after a network interruption or power loss. It should not reuse stale session material or retransmit data the wrong way after recovery. FDA guidance treats resiliency and recovery as required controls.[7][3][6]
Run Threat, Vulnerability, and Penetration Testing
Run all four test types because each one gives you different evidence.[3][5]
| Testing Type | Objective | Method | Required Evidence |
|---|---|---|---|
| Security requirements testing | Verify that defined security controls were implemented as specified | Trace each requirement to a test case and run it | Requirement traceability matrix, test cases, pass/fail results |
| Threat mitigation testing | Verify that specific risks are actually controlled | Execute attack scenarios such as replay, man-in-the-middle, and protocol misuse | Attack scenarios tested, mitigations exercised, observed outcomes |
| Vulnerability testing | Identify exploitable weaknesses in exposed components | Scanning, software composition analysis, and static and dynamic analysis across exposed services, APIs, ports, web interfaces, and wireless interfaces | Scan results, code-analysis findings, remediation status, rationale for any deferred fixes |
| Penetration testing | Attempt to chain weaknesses into a realistic compromise of the end-to-end communication path | Independent, adversarial testing targeting the full interoperability workflow | Attack narratives, proof of exploitability, impact assessment, residual risk decisions |
Penetration testing should be independent and adversarial. It should not be a repeat of the vulnerability scan. The tester needs to chain weaknesses to bypass defenses, alter clinical data, or interrupt communication. Use the Step 1 threat model to focus on the highest-risk paths, including wireless telemetry, remote servicing endpoints, cloud APIs, and HL7 gateways.[22][3]
Log every finding in the remediation workflow so Step 4 can document the evidence.
Step 4: Document Evidence for FDA Review and Ongoing Risk Management
Step 4 is where test output becomes a package you can stand behind during FDA review and use later for lifecycle risk management. Start with the Step 3 remediation log and build from there.
Build the Test Plan, Report, and Communication-Path Evidence
At a minimum, the package should include a Cybersecurity Risk Management Report that covers the threat model, risk assessment, and unresolved anomalies. It should also include end-to-end architecture diagrams that show communication paths, trust boundaries, and protocol stacks, plus a formal test plan with objectives, scope, and pass/fail criteria. Add test execution records with actual results, defect details, and residual risk decisions.[15][16]
You should also attach sanitized protocol traces, such as TLS handshakes, HL7 message exchanges, and DICOM transactions, to show authentication, encryption, and error handling on each path.[15][1] That kind of record makes security claims easier to verify.
For every defect found during testing, document:
- Severity
- Exploitability
- Patient safety impact
- Current status: remediated, mitigated, or accepted with a reevaluation date[15][16]
Residual risk decisions should also spell out the rationale and identify the stakeholders who signed off, such as engineering, clinical, and security.[27]
Connect SBOM, Component Risk, and Test Findings
Next, connect each report item to the software behind it. Under section 524B of the FD&C Act, effective March 29, 2023, an SBOM is a statutory requirement for cyber device premarket submissions.[4][15] Produce a machine-readable SBOM in SPDX or CycloneDX format that covers every software component involved in communication paths, including protocol libraries, cryptographic modules, interface middleware, and client/server stacks.[25][26]
Then link each component to its known vulnerabilities, remediation or patch status, vendor support status, and, where available, end-of-support dates.[16][28][29] After that, connect those entries directly to your test findings.
For example, if a mutual TLS test failed because of a legacy SSL library, the documentation should say so plainly.[15][16][26] That traceability helps FDA reviewers and internal governance teams see which components are driving interoperability risk and whether those risks are under control.[15][16][26]
Map Evidence to Requirements Using Structured Tables
Finish with a traceability table that maps each FDA requirement to the evidence that supports it. FDA guidance spans secure product development, threat modeling, architecture, authentication/authorization, cryptography/data protection, SBOM, security testing, vulnerability management, postmarket monitoring, patch management, labeling, and interoperability security. A structured traceability table is one of the simplest ways to show coverage across all of that.[23]
| Requirement | FDA Expectation | Evidence Artifact | Status | Residual Risk/Rationale |
|---|---|---|---|---|
| Cybersecurity risk management | Threat model, risk assessment, unresolved anomalies | Cybersecurity Risk Management Report | Met / Partial / Open | If open, document the anomaly and acceptance rationale |
| Architecture documentation | End-to-end communication paths, trust boundaries, protocol stacks | System diagrams, interface inventory | Met / Partial / Open | If partial, note any unresolved interface gaps |
| Security testing | Requirements testing, threat mitigation, vulnerability, and penetration testing | Test plan, test execution records, protocol traces, pen test report | Met / Partial / Open | If open, record compensating controls and follow-up testing |
| SBOM | All commercial, open-source, and off-the-shelf components with support status | Machine-readable SBOM (SPDX or CycloneDX), component risk addendum | Met / Partial / Open | If open, document component risk and support gaps |
| Vulnerability management | Postmarket monitoring, coordinated disclosure, patching procedures | Postmarket cybersecurity plan, vulnerability management procedures | Met / Partial / Open | If open, track remediation items and due dates |
| Residual risk decisions | Documented rationale, stakeholder sign-off, time-bound reevaluation plans | Risk acceptance records within test report and risk management report | Met / Partial / Open | Capture sign-off rationale and reevaluation timeline |
Add Status and Residual Risk/Rationale columns so the table works as a living record that can be updated as the device changes or new vulnerabilities emerge.[16][27] It also makes postmarket monitoring and change control much easier, because you can quickly see which components, tests, and records are affected when vendor support changes or a new CVE appears.
Conclusion: A Repeatable Process for Safe, Secure Interoperability
Once the evidence package is done, the job isn’t over. FDA cybersecurity guidance and IEC 80001-1 both expect lifecycle management for safety, effectiveness, and security. Every firmware update, interface change, or shift in a trust boundary can trigger retesting.[2] That’s why this process has to stay active after go-live.
Treat these four steps as a repeatable process, not a one-and-done checklist: define scope, build a realistic testbed, test function and security together, and keep the evidence ready for review and later changes.
Key Takeaways for HDO and Vendor Teams
For HDO and vendor teams, the core discipline is straightforward: keep the evidence chain intact from scope through remediation.
A few principles are worth keeping in play:
- Test real paths under real conditions. Check end-to-end flows in both normal and fault conditions. Set measurable thresholds for latency, encryption, and logging before testing starts, not after the results come in.
- Collect defensible evidence and connect it to remediation. Protocol traces, audit logs, and traceability tables help make results credible for FDA reviewers. Every open defect should have an owner, a severity rating, and a timeline, whether it sits with the vendor or the HDO.
A centralized workflow can help teams keep that process current. Censinet RiskOps™ can help HDO and vendor teams track device changes, advisories, and risk decisions across testing cycles.
That kind of repeatability turns interoperability testing into an ongoing risk control, not a one-time compliance task.[10][2]
FAQs
What should be included in an interoperability test scope?
An interoperability test scope should assess the device in the context it actually operates in, not in isolation. That means looking at the full system around it: hardware interfaces, cloud services, and both wired and wireless connections. The scope should line up with the device’s architecture and its clinical use case, and it should cover every external-facing interface and each point where data or commands move in or out.
It should also include security requirements, threat mitigations, and vulnerability testing, including penetration testing and fuzz testing, along with an SBOM. Just as important, the testing should confirm that protocols such as Bluetooth or Wi-Fi stay secure without interrupting data exchange.
How do you test secure communication between medical devices?
Testing secure communication between medical devices takes a layered approach. The goal is simple: keep data private and make sure it isn’t changed in transit.
Start with data flow diagrams. They help you map how information moves between devices, apps, gateways, and servers. Once that path is clear, it’s much easier to spot which protocol elements need protection.
Use encrypted protocols like TLS 1.3. Then check mutual authentication between devices and servers so both sides prove who they are before any data is exchanged. That step matters a lot in medical settings, where a bad connection isn’t just an IT issue.
Testing should cover a few core areas:
- fuzz testing
- penetration testing
- static and dynamic code analysis
- boundary analysis
- verification of cryptographic modules and hardware-backed key storage
This mix helps you look at the problem from different angles. One test may catch malformed input issues. Another may show weak auth checks or poor key handling. Put together, they give you a much clearer view of how secure the communication stack is under normal use and under stress.
What evidence is needed for FDA review?
For FDA premarket submissions, you need to show that cybersecurity is part of the device from the start - not something added at the end.
That means including documentation that shows how security is built into the device’s design and lifecycle. In practice, that usually includes:
- a security risk management report
- a machine-readable SBOM
- architecture views
- a threat model
- a requirements traceability matrix
You’ll also need testing reports that back up those documents. Include results for vulnerability scanning, penetration testing, fuzz testing, and secure update validation.
On top of that, add a postmarket plan that includes coordinated vulnerability disclosure.
To meet FDA technical screening requirements, use the eSTAR template.
